Developer guide
In this section we report some general guidelines for contributing to ExoNAMD development.
The section is inspired by the packages ExoSim2.0 and PAOS, it is a fac-simile of the PAOS developer guide.
Coding conventions
The ExoNAMD code has been developed following the PeP8 standard and the Zen of Python (write import this in a Python shell to see it).
Documentation
Every ExoNAMD function or class should be documented using docstrings which follow numpydoc structure.
This web page is written using the reStructuredText format, which is parsed by sphinx.
If you want to contribute to this documentation, please refer to sphinx documentation first.
You can improve this pages by digging into the docs directory in the source.
You can compile this documentation using the following commands. First, move in the docs directory, then:
make html
to compile the html version, or
make latexpdf
to compile the pdf version.
The outputs will be generated under docs/build/html or docs/build/latex, respectively.
Testing
Unit-testing is very important to make sure that each code addition is tested and validated and the code never breaks. This shall be provided after ExoNAMD v0.3.0.
Logging
To keep a logger is very important when coding, hence we utilize the loguru Python package.
Here are some examples of how to use it:
from exonamd import logger

logger.info("info message")
logger.debug("debug message")
logger.warning("warning message")
logger.error("error message")
logger.critical("critical message")
The logger output will be printed on the run or stored in the log file, if the log file option is enabled.
To enable the log file, the user can refer to exonamd.log.addLogFile.
The user can also set the level of the printed messaged using exonamd.log.setLogLevel, or enable or disable the messaged with exonamd.log.enableLogging or exonamd.log.disableLogging.
Versioning conventions
The versioning convention used (after ExoNAMD v0.3.0) shall be the one described in Semantic Versioning (semver) and shall be compliant to PEP440 standard. In the X.Y.Z scheme, for each modification to the previous release we increase one of the numbers.
X
increased only if the code in not compatible anymore with the previous version. This is considered a Major change.
Y
increased for minor changes. These are for the addition of new features that may change the results from previous versions. This are still hard edits, but not enough to justify the increase of an X.
Z
the patches. This number should increase for any big fixed, or minor addition or change to the code. It won’t affect the user experience in any way.
Source Control
The code is hosted on GitHub (https://github.com/abocchieri/ExoNAMD) and structured as following.
The source has two main branches:
mainbranch for stable and releases. It is the public branch and should be handled carefully.
developworking branch where the new features are tested before they are moved to the master branch
Adding new features
New features can be added to the code following the schemes designed above.
If the contributor has writing rights to the repository, should create a new branch starting from the develop one. In the new feature branch the user should produce the new functionalities, according to the above guidelines. When the feature is ready, the branch can be merged into the official develop one.
To create the new feature starting from the current develop version, the contributor should run
$ git checkout develop
$ git checkout -b feature/<branchname>
The completed feature shall then be merged to the develop:
$ git checkout develop
$ git merge feature/<branchname>
$ git push
Once a feature is completed and merged, the contributor should archive the branch and remove it, to keep the repository clean. The usual procedure is:
$ git tag archive/<branchname> feature/<branchname>
$ git push --tags
$ git branch -d feature/<branchname>
Remember to delete the branch also from the remote repository. If needed, the feature branch can be restored as
$ git checkout -b <branchname> archive/<branchname>
If the contributor does not have writing rights to the repository, should use the Fork-and-Pull model. The contributor should fork the main repository and clone it. Then the new features can be implemented. When the code is ready, a pull request can be raised.
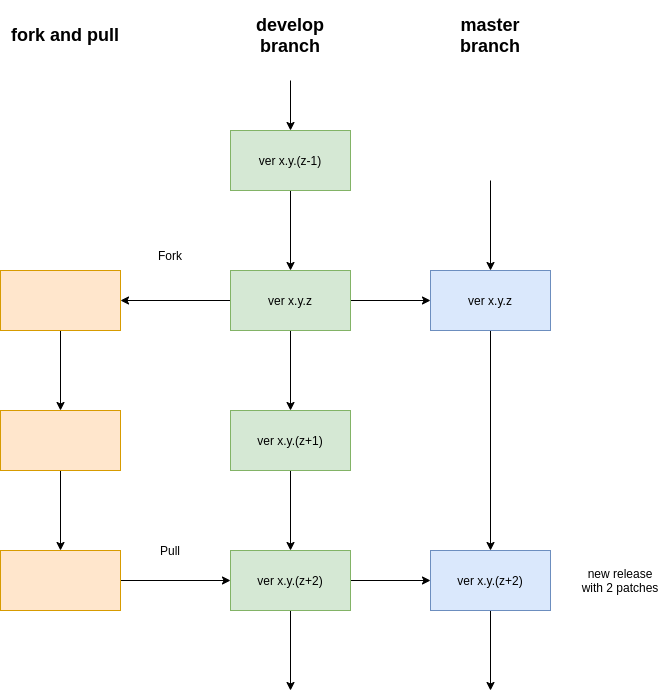
Fig. 1 Forking and pulling